
25 Christmas Window Painting & Decorating Ideas: Easy, Funny & Show-Stopping Designs
Most holiday decorations live in a box for eleven months. Window art doesn’t. It costs about as much as a couple of coffees, it takes one evening, and when the season ends you wipe it away and your glass is clean again. For a renter, that last part is the whole appeal.
It also does something a wreath can’t. A painted window works from two directions at once: it decorates the room for you and puts on a show for everyone walking past.
Below you’ll find 25 Christmas window painting ideas sorted by skill and mood, from five-minute borders to a full snowy village. There are lettering ideas, funny designs, Grinch and Charlie Brown-inspired scenes, and a white-only look for people who want it quiet. Before the ideas, there’s a short section on paint, glass and layering, because that’s where most first attempts go wrong.
If you’re decorating more than the windows this Christmas, our Christmas decor ideas guide covers coordinated colors, lighting, Christmas trees, living rooms, kitchens and seasonal entryway styling.
The easiest way to do Christmas window painting is to use washable tempera paint or liquid chalk markers on clean, dry glass, and tape your design to the outside of the window as a guide. Trace it from inside, keep shapes bold, and wipe it all off with a damp cloth in January. Start with a snowflake row, a candy cane border or a painted “Merry Christmas” and you’ll be done in an hour.
Before You Paint: What Actually Works on Glass
Glass is slick, so paint that behaves on paper often beads, streaks or runs on it. A few decisions up front save you a lot of wiping.
Before painting, check that the product is intended for temporary use on glass and follow its removal instructions. Test a small, inconspicuous area first, especially if your window has tinting, film or a special coating. A washable label does not guarantee easy removal from every surface.
Before choosing a marker, check the manufacturer’s instructions for glass preparation, drying and removal. For example, the POSCA glass painting and removal guide explains how its markers behave on glass and how unsealed designs can be removed with water.
Which paint or marker should you use?
Each product trades off ease, color and cleanup differently. Pick by how much detail your design needs.
- ✓
Washable tempera paint:The budget pick and the best for large filled shapes. It’s opaque, comes in every color, and wipes off with a damp cloth. Stir in a tiny drop of dish soap so it grips the glass instead of beading. Because it’s water-soluble, it won’t survive rain or heavy condensation.
- ✓
Liquid chalk or window markers: Best for lettering, outlines and small details. They give you pen-like control, which tempera can’t, and they wipe off easily. Test one in a corner first, since a few brands leave a faint ghost on some glass.
- ✓
Acrylic craft paint (thinned) or dedicated window paint: Brighter and more durable, and also harder to remove. Fine for glass you plan to keep painted all season. Skip it on rental windows unless the label says removable.
- ✓
Faux snow spray with a stencil: Gives you a frosted look in minutes. It’s easy for beginners, and it cleans up with a damp cloth and a bit of patience.
If children are helping, choose age-appropriate, washable art materials and look for the ACMI Approved Product (AP) Seal where available. Follow the product’s instructions, supervise young children and keep all painting activities safely within reach from the floor.
Painting inside: which side of the glass, and in what order?
Almost everyone paints from the inside, and almost everyone forgets that the layering order changes what the outside sees.
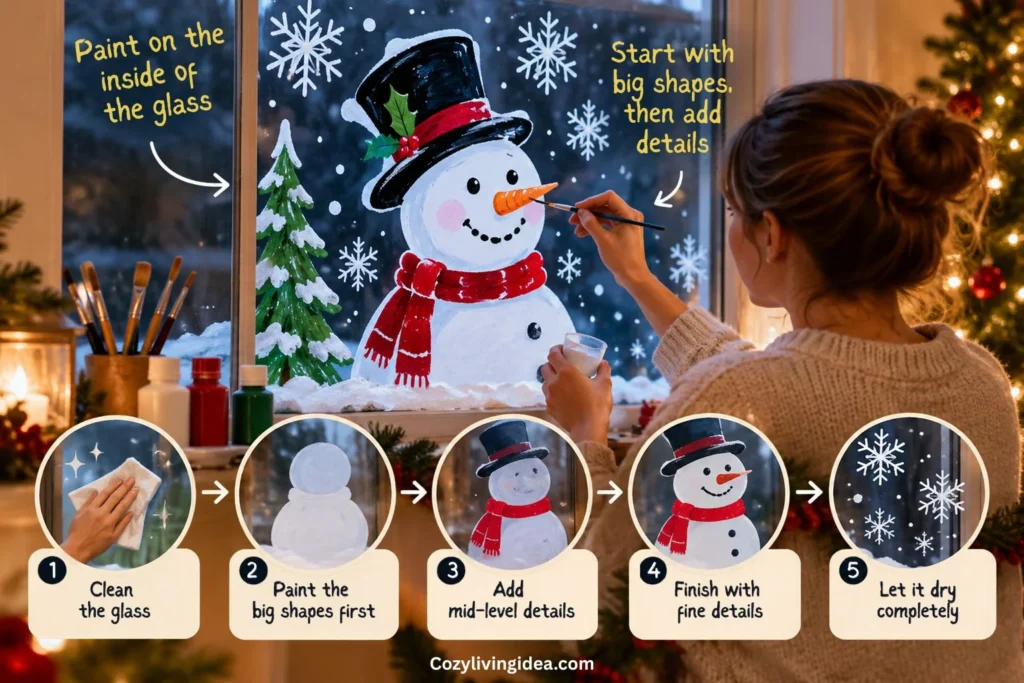
When you paint on the inside surface, anyone on the street looks through the glass at your first layer. So if the street view matters most, paint the details first (outlines, eyes, highlights) and the background last. If you mostly care about the view from the room, paint background first, the way you would on paper.
Decide your main audience before you pick up a brush. For a front window facing the street, work detail-first. For a kitchen window nobody walks past, work the normal way.
Text is the other trap. Letters painted from the inside read backwards from the outside unless you trace a guide taped to the outer glass. That’s why the templates section below tells you to tape every design to the outside of the window.
For a kitchen that feels festive beyond the painted window, explore our Christmas kitchen decor ideas for cabinet wreaths, countertop displays, seasonal shelves and Christmas coffee stations.
Supplies checklist
- ✓
Washable paint or chalk markers (white, red, green, gold and a dark color cover most designs)
- ✓
A small flat brush and a fine round brush
- ✓
Painter’s tape for straight borders and masking
- ✓
A damp microfiber cloth and cotton swabs for corrections
- ✓
Glass cleaner and a dry cloth to prep the window
- ✓
A towel or cardboard along the sill to catch drips
Paint one pane at a time and don’t lean your sleeve on wet sections. Keep a handful of cotton swabs nearby, because they lift small mistakes off the glass more cleanly than a cloth does.
A note for renters
Check your lease if you’re unsure, but washable paint and chalk markers on inside glass are about as low-risk as decorating gets. Avoid painting on the outside of upper-floor windows, on tinted or film-coated glass, or on anything you’d have to scrape to remove.
If you’re decorating a rental beyond the glass, our small apartment Christmas decor guide has more ideas for windows, walls, doors and compact holiday displays that don’t take over limited floor space.
Easy Christmas Window Painting Ideas for Beginners
If you’ve never held a brush against a window, begin here. These designs are forgiving: they use repeating shapes, which means one imperfect snowflake disappears among five others. They’re also the quickest route to a window that looks finished.
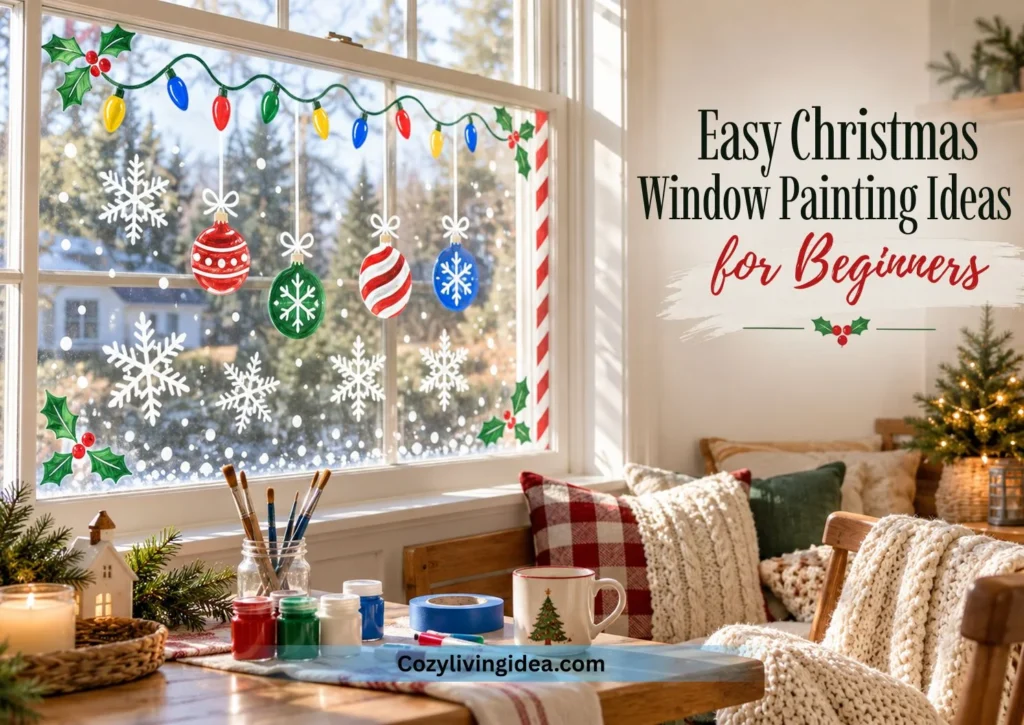
1. A Row of Stenciled Snowflakes
Tape a paper or cling-film snowflake stencil to the glass and dab white paint on with a sponge. Space three to five snowflakes in a loose line and vary their sizes. Dabbing with a sponge instead of brushing gives a soft, frosted edge, and if the stencil slips, the print still looks organic.
2. A Dotted Snowfall Border
Run a border of white dots around the edge of the pane, using bigger dots near the corners and tiny ones along the sides. The uneven sizes are what make it read as falling snow. Use the end of a brush handle or a cotton swab as a stamp, and you’ll get consistent circles with zero skill.
3. A Candy Cane Stripe Frame
Mask a diagonal stripe pattern around the window frame with painter’s tape, then paint the gaps red. Peel the tape once the paint is dry to the touch, and you’ve got a crisp, graphic border. This is the neatest-looking design for people who think they “can’t draw.”
4. Holly Clusters in the Corners
Paint small bunches of holly in the lower corners: three leaves, a few red berries, and a short brown stem. Paint the berries last so they stay bright and don’t smear into the green. It decorates the window without blocking the view or the daylight.
5. A Row of Ornaments on Strings
Draw thin hanging lines from the top of the pane, then paint a round ornament on the end of each one. Vary the colors and the heights so the row feels loose, and add a stripe, dot or star to each ornament. Use a plate or jar lid to trace a circle, which gives you round shapes with no practice.
6. A String-Lights Doodle
Sketch a drooping cord across the top of the glass, then add small bulbs in red, gold, green and blue. Add a tiny white highlight to each bulb and it looks lit even in daylight. Window markers handle this better than paint because the lines need to stay thin.
Merry Christmas Window Painting: Lettering Ideas
Words give a window a clear message, and they can cover a lot of glass with little effort. Letters are also where most first-timers hit the backwards-text problem, so use a guide.

7. A Script “Merry Christmas” Across the Top
Print “Merry Christmas” in a mirrored (reversed) layout, then securely position the template on the outside of the window with the printed design facing inward, provided you can reach the glass safely. Trace the reversed lettering from inside. When viewed from outdoors, the words will appear correctly oriented.
8. One Big Word: “Joy” or “Noel”
A single word with plenty of empty glass around it looks more deliberate than a full sentence squeezed in. Frame it with a few stars or a sprig of holly and stop there. This one also looks good on small windows where a longer phrase wouldn’t fit.
9. XMAS in Bold Block Letters
Block letters need no calligraphy, just a ruler and some patience. Paint each letter a different color, or use white with a red outline, and add small dots or stars in the gaps. The simple, blocky shapes carry a retro feel that suits farmhouse or mid-century rooms.
10. A “Happy Holidays” Window With a Menorah and a Star
A mixed-faith household, shared building or storefront-style entryway is a good place for an inclusive design. Paint a menorah on one side, a star or small tree on the other, and “Happy Holidays” between them. Keep the scale of both symbols matched so neither looks like an afterthought.
Christmas Window Painting Templates: How to Use and Make Your Own
A template turns “I can’t draw” into “I can trace,” and it’s the single biggest quality jump you can make.
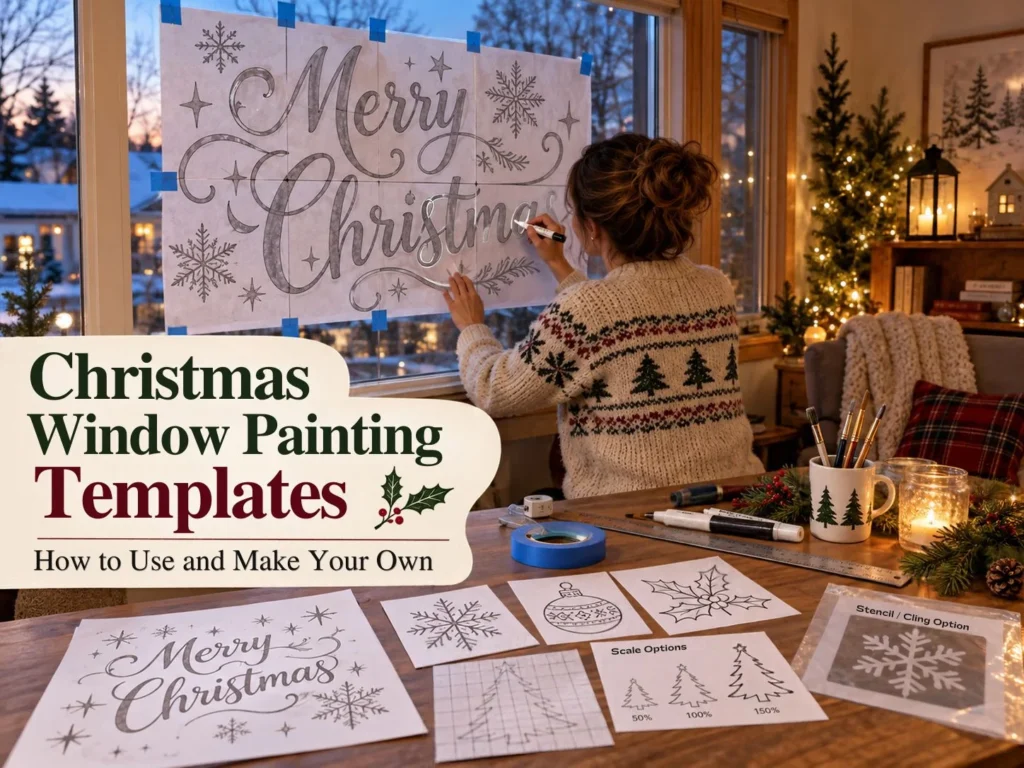
The tape-to-the-outside method
Print or draw your design at the required size. For lettering intended to be read from outdoors, mirror the words before printing.
Where safely accessible, tape the template to the exterior glass with the design facing inward. Do not lean out of upper-floor windows to attach a template.
Trace the design onto the inside glass with a suitable removable marker or brush.
Remove the template, fill the shapes, and check the design from its intended viewing side.
Because the paper faces the correct way from outside, your lettering reads right to people on the street.
Getting a design to the right size
- ✓
Print and tile: Most printers can split a large image across several sheets. Tape the sheets together and you’ve got a window-sized template.
- ✓
Grid method: Draw a grid over a small sketch, draw a matching but bigger grid on butcher paper, and copy square by square.
- ✓
Projector: A small projector throws the image straight onto the glass, so you can trace it at night with the lights off.
- ✓
Cling stencils: They hold to the pane without tape and are reusable. They’re ideal for repeating snowflakes, stars and letters.
Save your templates in a folder or envelope after the holidays. A reusable set means next December’s windows take half the time.
Classic Christmas Window Scenes
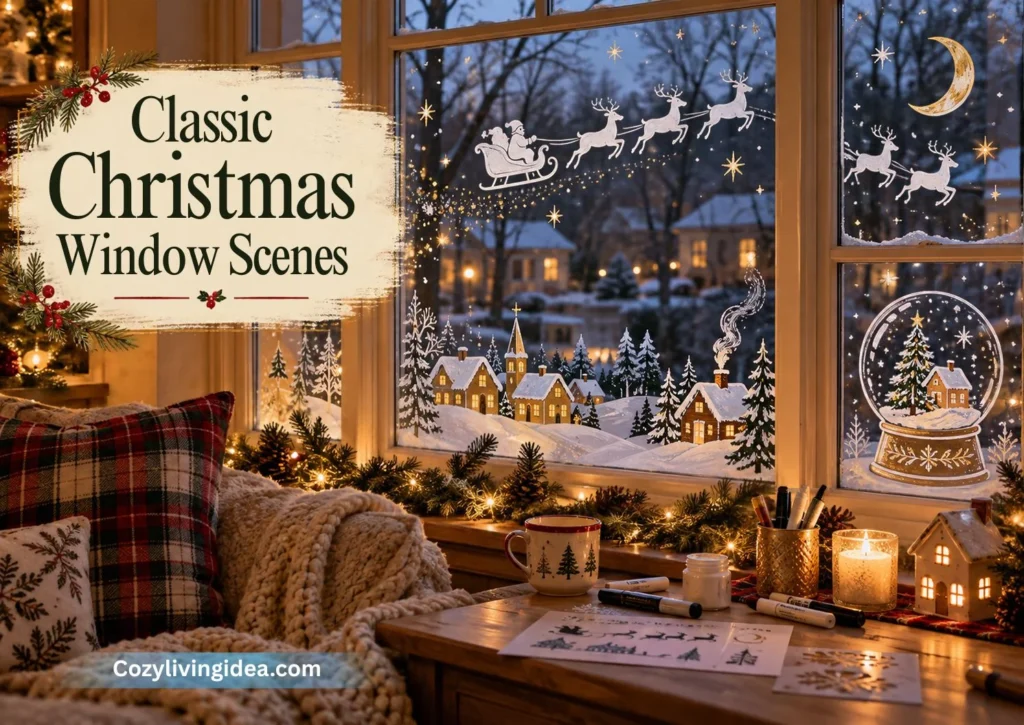
Once you’ve built confidence, scenes bring the most payoff. They tell a story, and on a street-facing window they get the most attention. Keep them simple: three or four elements is plenty.
11. Santa’s Sleigh Over the Rooftops
Paint a dark sky, a thin curve of rooftops along the bottom, and a small sleigh with a few reindeer mid-flight. A silhouette in one dark color is easier than a full-color Santa, and it looks sharper from a distance.
12. Reindeer Silhouettes Under a Crescent Moon
Draw a pale crescent moon, then run three or four black reindeer in a leaping arc beneath it. Tiny white dots for stars finish the scene. The shape does all the work, so there’s no need to paint fur or faces.
13. A Snowy Village Along the Bottom
Paint a row of small houses with snowy roofs and warm yellow windows along the lower third of the glass. Put taller buildings at the edges and shorter ones in the middle. This leaves the upper pane clear for light and gives the whole room a picture-book view.
14. A Cabin With a Smoky Chimney
One small log cabin, a few pine trees, and a swirl of chimney smoke is a full scene in itself. Use a lighter wash for the smoke so it reads as drifting rather than solid.
15. A Painted Snow Globe
Draw a large circle, add a small base, and paint a tiny scene inside: a tree, a snowman or a cottage. Dot the “snow” around the scene. It frames a mini-picture, so it works well on smaller windows.
16. A Nativity Silhouette Under a Star
Use dark brown or black paint for the figures and manger, then place one gold star above. Leave lots of clear glass around it. The simplicity matters here: a quiet silhouette feels more reverent than a crowded, colorful one.
Funny Christmas Window Painting Ideas
Humor works well on glass because passersby get the joke in two seconds. These designs cost the same as any other and spark more conversation.
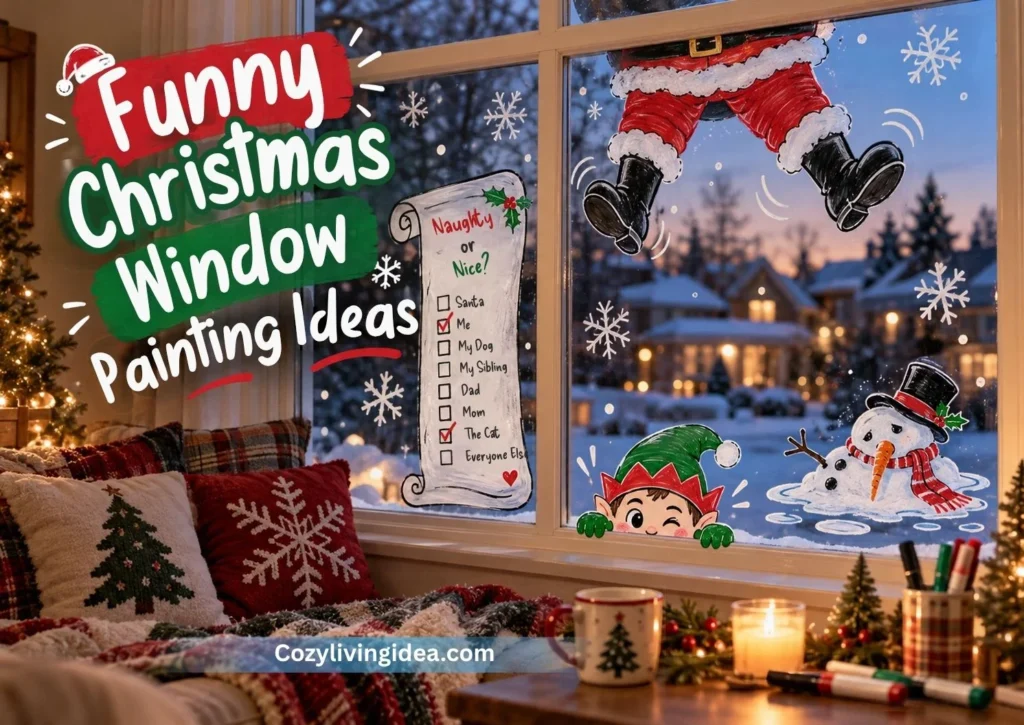
17. Santa Stuck in the Window Frame
Paint only a pair of red-suited legs and black boots kicking out of the top of the frame, as though Santa lodged himself on the way in. The gag needs no face, and it’s about ten minutes of work.
18. A Snowman Melting Into a Puddle
Paint a snowman with a drooping scarf and a growing white puddle at his feet, plus a tiny sun in the corner. It’s a good one for warmer climates, where a real snowman isn’t coming.
19. The Naughty-or-Nice List
Paint a long scroll running down the glass with “Naughty or Nice” across the top and a few checkmarks. Leave space to add family names with a marker, then tick them off as the month goes on. Kids love checking where they landed.
20. The Elf Peeking Over the Sill
Paint a small elf face and two mittened hands gripping the bottom edge of the pane, as if he’s sneaking a look inside. Because it sits right on the frame, it looks like a real prank and uses very little glass.
21. An Ugly Christmas Sweater Outline
Paint a big sweater shape and fill it with clashing patterns: reindeer, zigzags, snowflakes and a pom-pom or two. Bolder and sillier is better, and it’s an easy way to let kids go wild without wrecking a design.
Grinch and Charlie Brown Christmas Window Painting
Familiar Christmas characters can inspire fun window designs, but their original artwork and distinctive character appearances may be protected by copyright and trademark rights. These ideas focus on original holiday artwork that captures a similar mood rather than reproducing official illustrations.
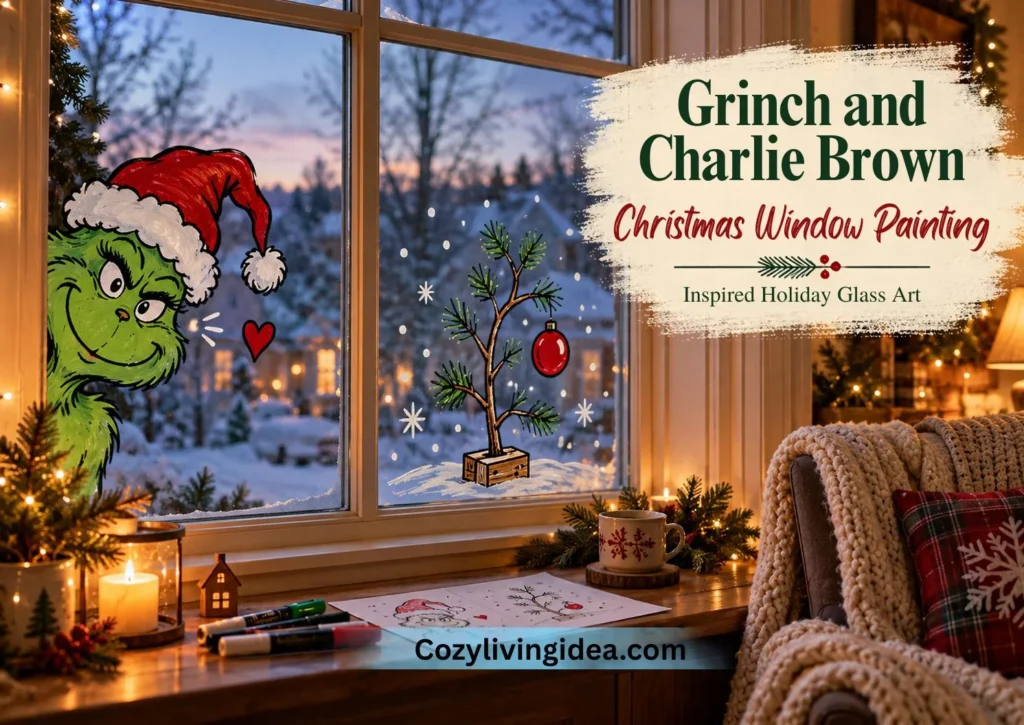
For a mischievous Christmas scene, use an original green holiday character. For a quieter, nostalgic design, try a small crooked Christmas tree with one oversized ornament. If you’re preparing artwork for commercial use, make sure you have the necessary rights to any protected elements.
22. Grinch Christmas Window Painting
The Grinch look is all attitude. Think a mischievous green silhouette peering at the room from one corner of the pane, a lopsided Santa hat, and a red-and-white color story against bare glass. Use a single bold green for the figure and let the open glass act as the snowy backdrop.
Keep the grumpiness readable at a distance by exaggerating the expression with a sly curve in one thick line, not lots of small detail. For a gentler version, paint a small heart in the corner to suggest the happy ending.
23. Charlie Brown Christmas Window Painting
This one runs on restraint. The look is minimal: lots of empty snowy glass, a single small tree that’s a little crooked, and one oversized red ornament, set against a soft blue-gray wash. Fewer elements is the whole point.
Because it needs so little paint, it’s a good candidate for a tiny window or a single pane of a larger one. Add a few white dots for snowfall and a thin hand-lettered line of text if you want to say something. Keep the style warm and slightly wobbly rather than crisp.
White Christmas Window Painting and Night-Glow Ideas
If bright color feels like too much for your room, go all white. A single color gives you a lace-like look that matches almost any décor, and it’s the most forgiving palette for beginners.
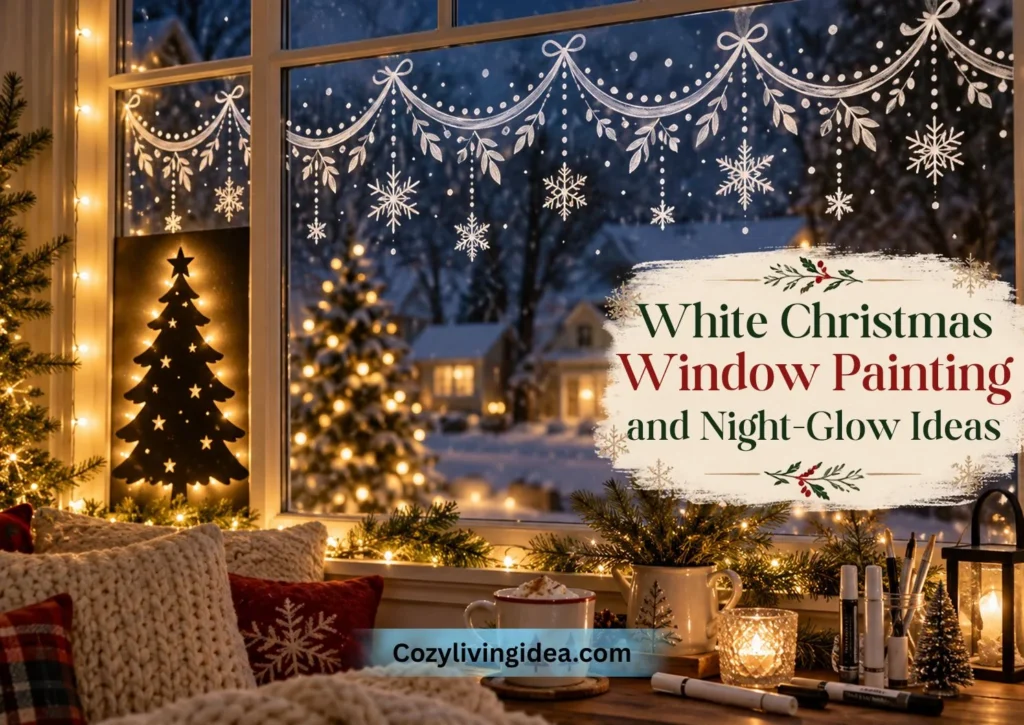
24. A White Lace Garland Across the Top
Paint a looping scallop across the upper third of the window, then add small snowflakes, dots and simple leaf shapes along it. Trace a bowl or jar lid for even scallops. It works like a valance, softening the top of the window without cutting off daylight.
25. Paint a Backlit Christmas Silhouette
Paint a bold Christmas tree, star or winter village silhouette directly onto the inside of the glass using removable window paint or markers. Keep the shape simple and leave clear glass around it so the outline stands out.
After dark, position a warm lamp or suitable decorative lights inside the room, safely away from curtains and other fabric. The backlighting makes the painted silhouette visible from the street without needing lots of colors or intricate details.
If your painted front window faces the street, you can coordinate it with the rest of the entrance. Our Christmas front porch decor ideas cover wreaths, planters, door garlands and outdoor lighting for a welcoming holiday display.
Any painted design looks better at night with a lamp or string light nearby. A warm bulb placed a foot or two from the glass lights the paint from behind and makes colors glow.
How to Paint Your First Window, Step by Step
Here’s the process I’d follow for a first window, start to finish.
Wipe it with glass cleaner and dry it fully. Grease and dust are the main reasons paint beads.
Choose one idea from above and scale it to your pane.
Tape the template to the outside and mark where the frame edges and borders fall.
Trace the outline with a marker or fine brush from the inside.
Work detail-first if the street view matters, background-first if the room view matters. Let each color dry to the touch before adding the next beside it.
Use a cotton swab to lift stray marks while the paint is still wet.
Step back and add the finishing touches: white highlights, a few snow dots, a border.
Common Mistakes (and the Fixes)
Painting too small. Tiny details disappear from a distance. If a shape wouldn’t read from the sidewalk, make it bigger or drop it.
Skipping the prep. Fingerprints and dust make paint bead and streak. A thirty-second wipe with glass cleaner prevents most of it.
Ignoring the viewing side. As covered above, layering order and mirrored text catch almost everyone once. Decide who the design is for, then work in the matching order.
Overloading the pane. Crowded windows look messy and block light. Leave open glass around every design so it has room to breathe.
Painting in the cold or damp. Water-based paint dries slowly on cold glass and can run when condensation forms. If the window is cold, warm the room first or wait for a drier day.
Sealing washable paint. It defeats the point. Skip sealants unless you’ve decided the design is staying.
How to Make It Last, Then Clean It Off
Washable paint and markers hold up for the season on dry inside glass, but they’ll smear if someone leans on them or if condensation builds up. Keep curtains and blinds from rubbing the design, and ventilate bathrooms or kitchens where steam forms.
To remove the design, follow the paint or marker manufacturer’s instructions. For products designed to wash off with water, start with a damp microfiber cloth and gently wipe a small area. Avoid abrasive tools, metal blades and strong solvents unless the window and paint manufacturers explicitly approve them. Take extra care with tinted, filmed or coated glass.
Do the cleanup within a few weeks of taking the design down. Paint that’s baked in sunlight for months is harder to shift.
Final Verdict
The best window of the bunch is usually the simplest: one idea, painted large, with room around it. Pick a single design from this list, give it one evening, and see how it looks from the sidewalk before you add anything else.
If your first window goes well, do the next one a little differently. A snowflake row on one pane and a funny Santa on another is how people end up with a street-corner favorite by December. Whatever you paint, the wipe-off in January means nothing here is permanent, so try something a bit bolder than you think you should.
Frequently Asked Questions (FAQ)
Washable tempera paint is the best all-round choice for filled shapes, and liquid chalk or window markers are best for lettering and fine detail. Both wipe off with a damp cloth. Acrylic window paint lasts longer but takes more effort to remove.
Use a template or stencil, keep shapes bold, and leave plenty of clear glass around each design. Repeating shapes like snowflakes and ornaments hide small mistakes.
For personal decoration at home, an inspired-by design is common. If you’re decorating a business or selling the artwork, draw your own original characters instead, since these characters are trademarked.
Print the words, tape the paper to the outside of the glass, and trace from the inside. The guide faces the right way for the street, so your lettering does too.
Wipe washable paint with a damp microfiber cloth. For dried paint, mist with soapy water, wait a minute, and wipe. Use a plastic scraper for stubborn spots.
Yes, with non-toxic washable paint and adult supervision for small children. Painting inside also keeps little ones off ladders and away from outdoor glass.