
Christmas Lantern Decor Ideas: 24 Easy Ways to Style Lanterns Indoors and Out
A lantern is the one Christmas decoration that comes with a frame, a light source and a door you can open to restock. That is why Christmas lantern decor ideas work at almost any budget. The hard part is already built, so you only add the filling.
Most lantern roundups show a pretty photo and stop there. This guide gives you the missing parts: what goes inside, what goes outside, and why each combination works. You also get the small details that decide whether a lantern still looks good in week five, like door size, light color, battery access and weather ratings.
Below are 24 looks for mantels, tables, windows and porches, including DIY and recycled Christmas lantern decor made from tin cans, jars and paper bags. If you are decorating the whole house, start with our Christmas decor ideas for every room and come back here for the lantern details.
To decorate a Christmas lantern, put a flameless candle or a short LED strand inside, add one filler such as ornaments, pinecones or a mini scene, then trim the outside with a small greenery swag and one bow. Keep the light flameless, leave the door easy to open, and group lanterns in odd numbers at different heights.
How to Decorate a Lantern for Christmas: The 4-Layer Formula
Every good lantern display uses the same four layers. Build them in this order and you will rarely have to start over.
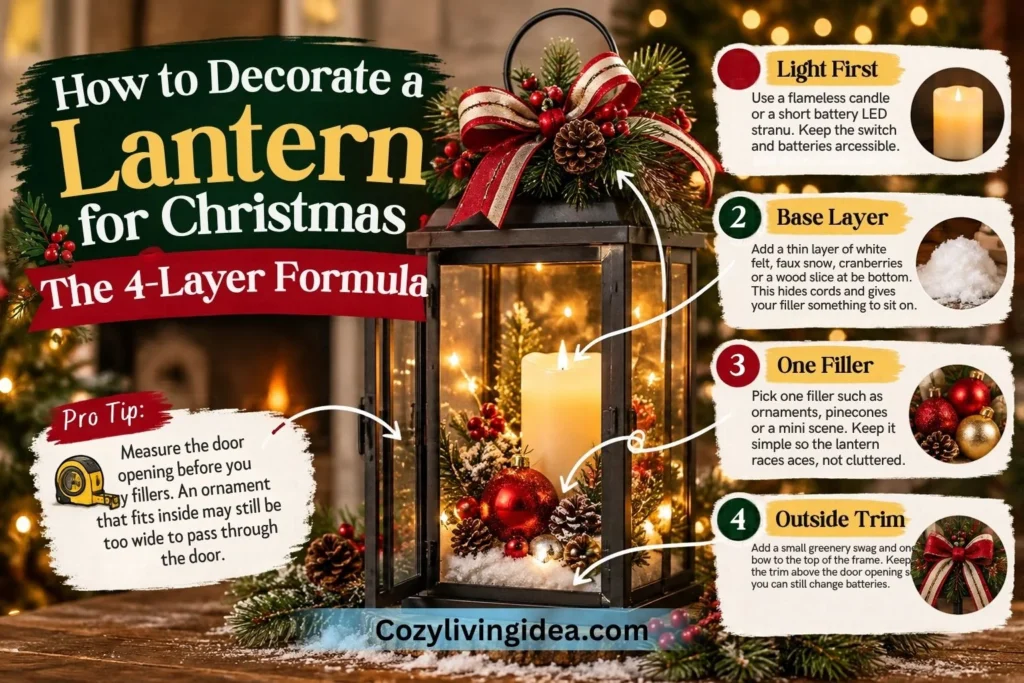
Set a flameless pillar candle or a short battery LED strand inside before anything else. You need the switch and battery pack where your hand can reach them, and decorations added first tend to bury both. Choose warm white. Mixing warm and cool white lights in one room looks accidental, even when each lantern looks fine alone.
Add a thin layer of white felt, faux snow, cranberries or a wood slice at the bottom. This hides cords and gives your filler something to sit on.
Pick ornaments, pinecones or a mini scene. Glass shows everything, so a lantern packed with three different fillers reads as clutter from the front.
Wire a small greenery swag and one bow to the top of the frame. Keep the trim above the door opening so you can still change batteries.
Measure the door opening before you buy fillers. An ornament or figurine that fits inside the lantern may still be too wide to pass through the door.
Why a flameless candle is the right call
A decorated lantern puts ribbon, greenery and paper within an inch of the light. The U.S. Fire Administration advises keeping candles at least 12 inches away from anything that can burn and suggests battery-operated flameless candles as an alternative. A glass wall does not change that math, so every decorated lantern in this guide uses flameless light.
Choosing the Right Lantern Before You Decorate
You can decorate almost any lantern, but some finishes suit certain looks better than others. Use this table to match the lantern you own (or plan to buy) to the style you want.
| Lantern Type | Best For | Watch Out For |
|---|---|---|
| Black metal | Farmhouse and modern looks, porches, mantels. Dark frames make ornaments and greenery stand out. | Cheap finishes chip outdoors. |
| White or distressed wood | Soft, snowy and Scandinavian looks on shelves and consoles. | Wood swells in damp weather, so keep it indoors or under deep cover. |
| Brass, gold or copper | Warm fairy lights and glam looks. Metal reflects the glow. | Polished finishes show fingerprints. |
| Frosted or mercury glass | Silver and white ornaments, soft diffused light. | Fragile, so keep it off busy walkways. |
| Red or green painted | A bold color pop beside a neutral door. | The frame competes with red bows, so keep the trim plain. |
| Mini lanterns (4 to 6 inches) | Tree ornaments and place settings. | Too small for a candle plus filler. Use a tiny LED only. |
Indoor Christmas Lantern Decorating Ideas
Indoors you can use paper, felt and fragile glass, so this is where to get detailed. These 13 looks run from classic to playful.

1. Evergreen and Red Berry Lantern
Start here if you only have time for one lantern. Lay a few short faux pine stems across the bottom of a black or white lantern, push red berry picks between them, and set a warm flameless pillar in the middle. Cut the stems about an inch shorter than the inside height so the roof does not crush them.
Keep the front glass clear. Red against green is the most recognizable Christmas pairing, so three simple materials are enough for the lantern to read as Christmas from across the room.
2. Ornament-Filled Lantern
Broken ornament sets are the secret supply for this one. Odd survivors from different boxes look intentional once they share a lantern.
Load large ornaments at the bottom, medium ones in the middle and small ones near the top. Mixed sizes lock together and leave fewer gaps. Thread a short LED strand through the layers so each ball catches light, and mix matte with shiny for depth. If kids or pets share your home, choose shatterproof ornaments.
3. Plaid Bow Lantern With a Lift-Off Swag
Build the decoration away from the lantern. Wire three greenery stems, one pinecone and a plaid bow into a single bundle, then fasten the bundle to the top of the frame with floral wire.
The payoff comes in January. The swag lifts off in one piece, the door never gets blocked, and the bare lantern goes straight back into rotation. On a black frame, buffalo plaid gives an instant farmhouse look for very little effort.
4. Pinecones, Cinnamon Sticks and Dried Orange
You smell this lantern before you see it. Stand bundled cinnamon sticks around a flameless candle, fill the gaps with pinecones, and press dried orange slices against the glass.
Backlit orange glows amber like a tiny stained-glass window. The cinnamon adds a light scent without any wax or spray. Keep the lantern indoors and dry, and swap out any slice that softens so mold never gets a start.
5. Burlap and Jingle Bells on a Wooden Lantern
Wood and burlap are both matte, so the bells become the only shine in the picture. That contrast keeps the look from going flat.
Wrap a strip of burlap around the top posts and tie it with twine. Thread three or four small bells onto a second length of twine and loop it over the handle. Let them hang outside the frame so they never knock against the glass.
6. Snowy Scene With Reindeer and Bottlebrush Trees
Treat the lantern like a tiny stage set. White felt makes a better snow than loose faux flakes, because it stays tidy and keeps flakes out of the battery pack.
Put a tall bottlebrush tree at the back, a reindeer figurine in front, and a short LED strand low behind the figures. Tall at the back and small at the front gives the scene depth. Check scale before you buy: the tree must clear the roof, and the figurine must fit through the door.
7. Silver Frosted Ornaments (The Mercury-Glass Look)
This is a lesson in restraint. Fill a lantern with matte silver, white and pale blue ornaments from one color family and stop.
A single palette looks more expensive than a mix, and matte finishes scatter the light softly instead of throwing hot spots. If the lantern itself is mercury glass, the reflections double the sparkle and the display looks fuller than it is.
8. Gold Lantern With Warm Fairy Lights
This is the laziest idea on the list and one of the best-looking. Pile a battery fairy-light strand loosely inside a brass or gold lantern and walk away.
Loose coils keep the bulbs visible, while a tight wind hides them. Brass reflects the warm light, so no other filler is needed. If the outside looks too plain, add one sprig of eucalyptus and nothing else.
9. A Cut-Out Lantern That Throws Star Shadows
Place this lantern within a couple of feet of a plain wall and the decoration grows well beyond the lantern. A punched or cut-out pattern of snowflakes or stars scatters light across the wall, and a flickering flameless candle adds gentle movement.
Cluster several shapes (a tall one, a round one, a faceted one) and the shadows overlap into a small constellation. No cut-out lantern yet? Idea 17 shows you how to make one from a tin can.
10. A Tiny Gingerbread Street Inside a Lantern
Scenes make people lean in, and a small village gives guests a reason to look twice. Set two or three ceramic or wooden gingerbread-style houses on a felt base, add a bottlebrush tree or two, and place a warm LED behind the houses so the windows glow.
Stop at three buildings or the lantern turns into a toy shelf. Skip real gingerbread, since it softens and invites pests over five weeks.
11. Nativity Lantern
A lantern works like a glowing niche, so a small nativity set looks right inside one. Place the figures on a removable wood or felt base, scatter a little raffia as straw, and put a warm LED behind them.
Give this one eye level on a mantel or entry table. Measure the figures against the door before buying a set, and skip extra trim so the scene stays the focus.
12. A Child’s Drawing as the Centerpiece
What is the cheapest lantern on this list that people will actually remember? This one. Tape a child’s reindeer or tree drawing to the inside of a glass panel (or print it on thin white paper or vellum) and put a flameless tealight behind it.
Backlit paper glows warmly, and a lantern like this is a keepsake you actually want on display. Scan the original and print the copy, so the real drawing stays safe in a drawer.
13. Mini Lanterns on the Christmas Tree
Round balls and flat stars dominate most trees, so a small boxy lantern adds a shape the eye does not expect. Hang four to six lanterns (4 to 6 inches) near the middle of the tree, where the branches are strongest.
Choose lightweight metal or wood so the branches do not droop. A tiny LED inside is a nice touch, and bare lanterns look fine too.
DIY Christmas Lantern Decor You Can Finish in an Evening
DIY Christmas lantern decor works best when each project takes under 30 minutes.

A basic lantern DIY kit covers all three projects below, so gather it once:
- ✓
Floral wire and scissors (adult use for sharp tools)
- ✓
Twine and narrow ribbon
- ✓
Tape
- ✓
Cardstock or old greeting cards
- ✓
Gold spray paint
- ✓
Flameless tealights
14. Mini Gift Box Lantern
Empty tea, jewelry and matchbox containers make perfect tiny presents. Wrap each box snugly in leftover paper, tape the seams on the inside so no tape shows, and tie each one with twine or ribbon.
Stack the biggest boxes at the bottom and angle the smaller ones on top, the way a real pile of gifts settles. Keep the palette to two or three colors so it looks designed. Paper burns, so leave this lantern unlit or use a flameless tealight only.
15. Hanging Paper Stars
Hanging stars at different heights make a lantern look full without much material. Cut five to seven stars in two sizes from cardstock or old greeting cards, poke a tiny hole in one point of each, and tie on thread.
Tie the threads to the lantern’s inside crossbar at different lengths, keep them clear of the door and the battery switch, and set a flameless candle below. Pale cream and blue stars read soft. Red cardstock reads bolder.
16. Gold-Sprayed Ornaments
Chipped or mismatched ornaments become a matching set with one coat of paint. Wipe each one clean, set them on newspaper outdoors, and spray from about 8 inches away in light coats. Test on one first, because gold paint runs faster than you expect.
Let them dry fully before handling, then fill a lantern using the layering from idea 2. Metallic paint reflects warm light, so even a few ornaments glow.
Recycled Christmas Lantern Decor From Things You Already Have
Recycled Christmas lantern decor costs close to nothing, and the finished pieces look handmade in a good way. Every project below uses flameless tealights.
17. Tin Can Punched Lantern
Plan ahead: This project needs overnight freezing before you punch the holes. Complete the metalwork in a separate session, or choose the jar lantern if you want something you can finish immediately.
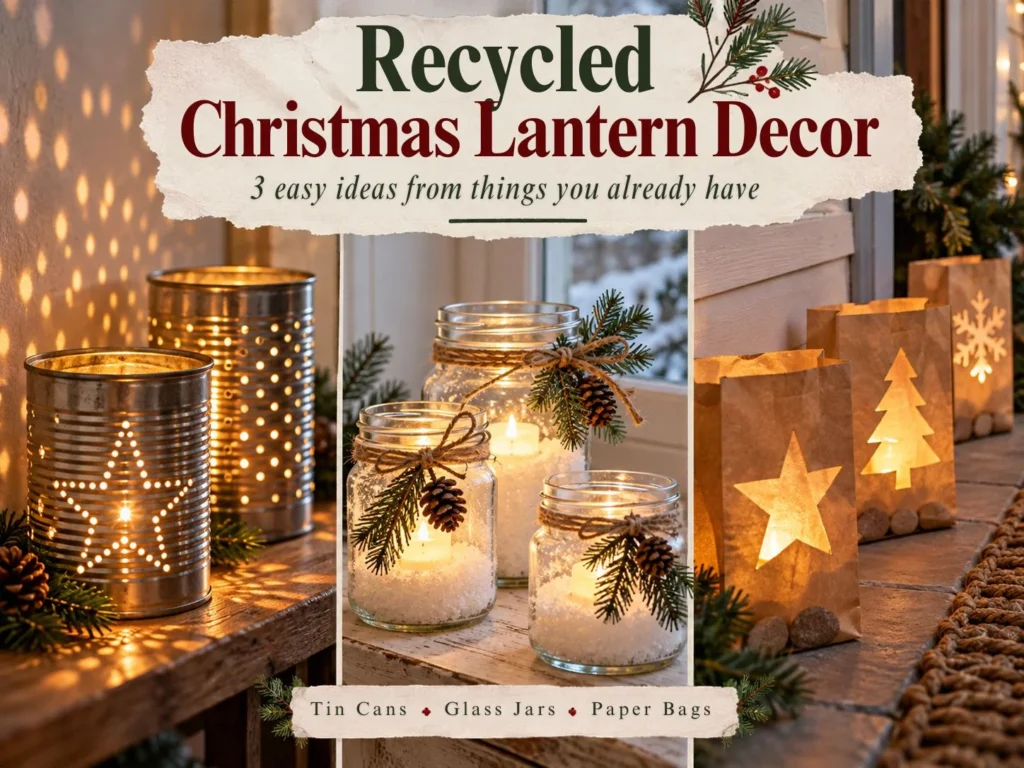
This is the classic recycled lantern, and the one project here where order matters. You need a clean food can with the label removed, a hammer and large nail, a paper template (stars, trees or dots), tape and some wire for a handle.
- ✓
Wash the can and check the top edge. Fold or sand any sharp spot.
- ✓
Fill the can with water and freeze it overnight. The ice keeps the can from crushing when you hammer.
- ✓
Tape the template on and tap the nail through to make each hole.
- ✓
Thaw and dry the can, then sand the inside of every hole to knock off burrs.
- ✓
Spray paint in light coats from about 8 inches away if you like, testing on scrap first.
- ✓
Make two holes near the top on opposite sides and thread the wire handle through.
The holes scatter tiny dots of light across the nearest wall, so one can looks far more elaborate than it is. Interior burrs are sharp, so keep these away from small children.
18. Glass Jar With Epsom Salt Snow
Pasta sauce jars and coffee jars are made for this. Pour one to two inches of Epsom salt into a clean jar, nestle a tealight into the salt, and tie twine around the neck with one small pine sprig tucked in.
Epsom salt crystals sparkle in the light, so the jar glows like fresh snow. Three jars in different sizes look intentional. For a frosted finish, dab a thin, uneven layer of white paint on the outside.
19. Paper Bag Luminaries
Brown lunch bags glow amber, and a row of them looks bold. Fold the top of each bag over once to form a cuff, draw a star, tree or snowflake on the front and cut it out (adults only for the craft knife).
Add a little sand to stabilize each bag, then place a battery-operated flameless tealight inside. Arrange the bags on a stable mantel, console or covered outdoor display surface away from walking routes, stairs, doorways and other exits. Keep them dry and use flameless lights only.
Outdoor Christmas Lantern Decor That Survives Wind and Weather
Outdoor Christmas lantern decor usually fails for three reasons: moisture, wind and weight. Settle these first and the styling is easy.
- ✓
Check the weather rating. Choose a lantern and light source specifically approved by their manufacturers for the intended outdoor conditions. IP44 indicates protection against splashing water, but it does not make a product suitable for submersion or every exposed location. Follow the manufacturer’s instructions for rain, snow, condensation and battery-compartment protection.
- ✓
Weigh the base. Hide a few flat stones or a small bag of sand at the bottom, under the greenery. A top-heavy lantern is the first thing to tip in a gust.
- ✓
Check hanging weight. Use a hook or bracket rated for the lantern plus its trim. A ribbon is decoration only and should never carry the load.
- ✓
Plan for cold batteries. Cold weather drains batteries faster, so choose units with a built-in timer that turns off by itself.
- ✓
Keep paths clear. A lantern on a step is a trip hazard. Place lanterns beside the path, not in it.
20. A Matched Pair Flanking the Door
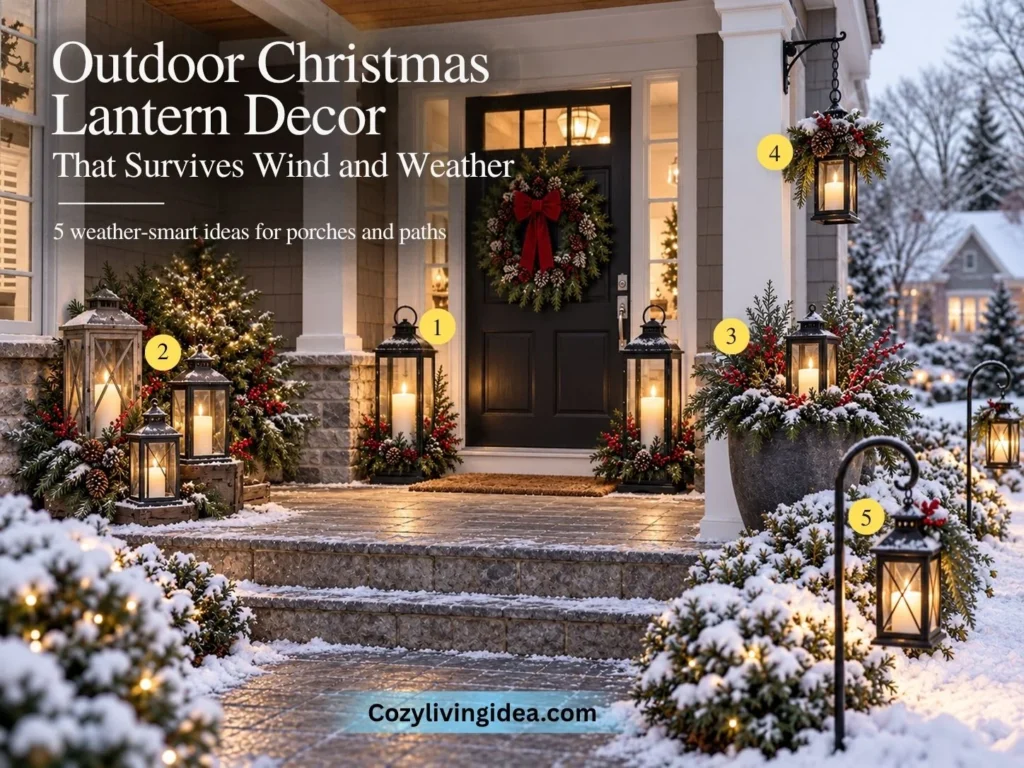
Symmetry reads as polished with almost no effort. Set two identical black lanterns, one on each side of the door, each with a bow and a small swag of greenery. Before you place them, open the door fully to confirm it still swings clear.
21. A Tall, Medium and Small Trio in One Corner
Three lanterns of different heights look collected, not matched. Group them on one side of the porch and raise the shortest on an upturned flowerpot or crate, so all three tops sit at different levels. The eye then travels from the doorway down to the floor.
22. A Lantern Nested in an Evergreen Planter
The pot solves the wind problem for you. Set an outdoor-rated lantern in an urn and pack evergreen cuttings around the base. The soil anchors the lantern, and the branches hide the weight at the bottom. Keep damp greenery away from the battery compartment.
23. A Hanging Lantern With a Mini Wreath
Hanging puts the light at eye level, which is where people notice it first. Hang a lantern from a porch hook and loop a small wreath around the chain or handle. In an apartment, use an existing hook or a tension rod, because adhesive hooks often fail in cold and damp.
If you rent, use an existing permanent hook only when it is rated for the lantern’s complete weight, including decorations. Avoid relying on ordinary tension rods or temporary adhesive hooks for a heavy hanging lantern. A freestanding lantern on a stable table or porch surface is often the simpler rental-friendly choice.
24. A Shepherd Hook Walkway
Evenly spaced light reads as a deliberate path, and it lights the way for guests. Line the walk with lanterns hung from shepherd hooks, spaced evenly. If your ground freezes, push the hooks in before the first hard frost.
Where to Put Christmas Lanterns in Each Room
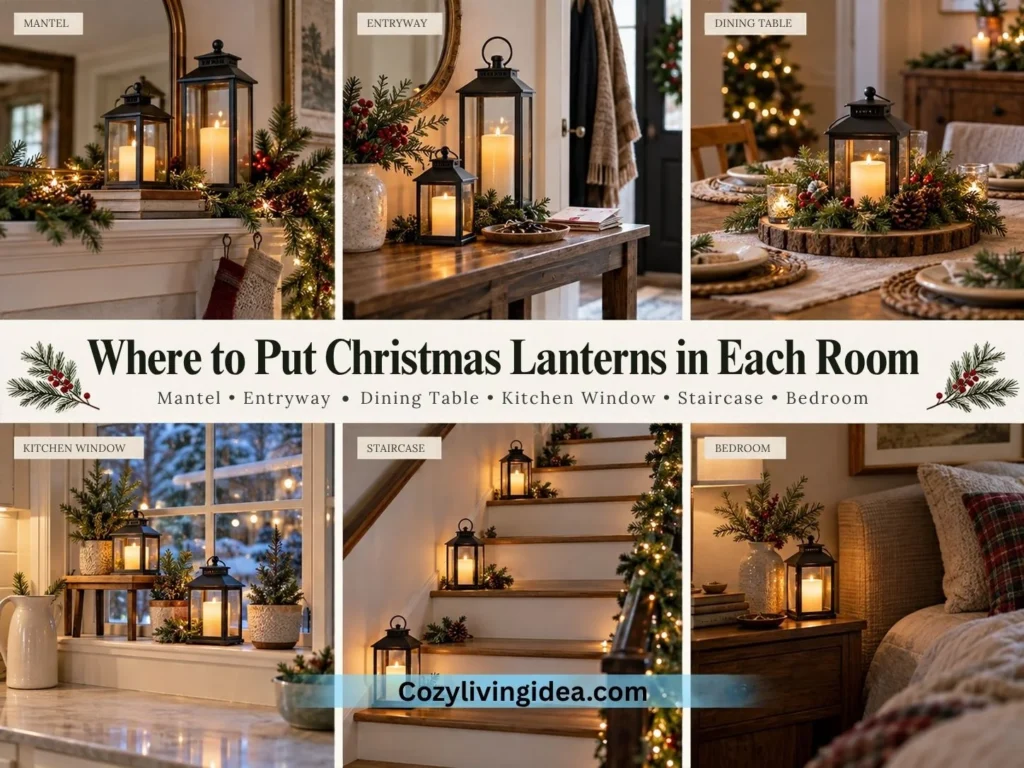
Mantel. Group three lanterns of different heights and raise the smallest one on a stack of books or a wood riser. Weave garland between them, but if you burn a fire, keep the greenery and lanterns well clear of the opening and follow your fireplace’s clearance rules.
Entryway console. Put the tallest lantern at the back and the shortest in front. Leave a landing spot for keys and mail, because a console you cannot use will get cleared off by day three.
Dining table. Keep a centerpiece under 12 inches tall or above 24 inches. Anything between those two heights sits at eye level when people are seated and blocks conversation. A low lantern on a wood slice with a ring of greenery around it fits that rule and leaves room for plates.
Kitchen windowsill. Small lanterns at different heights look good from inside and outside at night. Keep them out of sink splash range and away from the stove.
Staircase. Keep stair treads, landings, handrails and walking routes clear of lanterns. Instead, create a display on a nearby console, a safely positioned shelf or another stable surface outside the traffic path. Flameless lighting gives you the same festive effect without adding obstacles to the stairs.
Bedroom nightstand. A small warm lantern on a timer switches itself off, so you do not have to get up to turn off the light.
Christmas Lantern Mistakes to Skip
Using a real candle in a decorated lantern. Greenery, ribbon, paper and faux snow all burn. Go flameless every time.
Overfilling the lantern. If you cannot see the light through the filler, remove a third of it. Empty space is part of the design.
Getting the scale wrong. A tiny figurine in a huge lantern looks lost, and an oversized decoration will not pass through the door. Measure first.
Mixing white light colors. Warm and cool white strands in one room clash. Stick with warm white throughout.
Burying the batteries. If changing a battery means unpacking the whole lantern, you will leave the dead light in place. Keep the switch within reach.
Bringing an indoor lantern outside. A closed door does not make a lantern weatherproof. Check the rating on the lantern and the lights.
Mixing too many themes. One lantern in red and green, another in pink and one in gold looks messy. Pick two colors and repeat them.
Budget and Renter-Friendly Lantern Tips
- ✓
Shop your house first. Spare ornaments, ribbon scraps, glass jars and pinecones cover most of what you need.
- ✓
Spend at the dollar store on small parts. LED tealights, berry picks, felt and ribbon are easy to find there and cheap to replace.
- ✓
Buy lanterns secondhand. Thrift stores often have them, and spray paint can match any color scheme.
- ✓
Skip the drilling. Use shelves, tables and floor lanterns.
- ✓
Store smart. Take the batteries out before packing, because leaking batteries ruin lights and lanterns. Wrap fillers in tissue and label the box by lantern.
- ✓
Buy one great lantern, not five okay ones. A good black metal lantern works for Christmas, winter and spring.
Final Thoughts
The best Christmas lantern decor ideas share one trait: they start with one clear focal point and stop there. Pick a hero lantern for the spot people see first, repeat its colors on a second smaller lantern, and keep every light flameless and warm white. Do that, and the rest of the decorating gets easier.
Save this guide for decorating day, and tell us which lantern you plan to make first.
Frequently Asked Questions (FAQ)
Use a flameless candle, ornaments, pinecones, a mini scene, small gift boxes or a short LED strand. Pick one filler and leave some empty space so the light shows.
Not in a decorated lantern. Ribbon, greenery, paper and faux snow can all catch fire. Use flameless candles, and if you burn a real candle in an undecorated lantern, keep it at least 12 inches from anything that burns.
Start with a lantern you own, then use ornaments, ribbon and pinecones from your house. Add dollar-store LED tealights and berry picks. Tin cans and jars cost nothing.
Fill a clean tin can with water and freeze it, hammer a pattern through a paper template, sand the holes, add a wire handle and drop in a flameless tealight. A glass jar filled with Epsom salt is even easier.
Only use an indoor lantern outdoors if its manufacturer explicitly approves that use. Check both the lantern and its light source for the expected weather exposure. A covered porch does not automatically make an indoor electrical product suitable for outdoor use.
Build a small bundle, tie it with floral wire, and fasten it to the top of the frame. Keep it above the door and clear of the battery switch so you can remove it after Christmas.